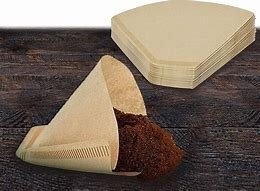
Why You Should Be Using Paper Filters

Brewing the perfect cup of coffee often comes down to the details, from selecting high-quality beans to choosing the right brewing method. If you’re using a Ninja Coffee Bar, one of the options available to you is utilizing paper filters. In this guide, we’ll walk you through how to fold and use paper filters effectively, ensuring your coffee experience is nothing short of delightful.
Why Use Paper Filters?
The Ninja Coffee Bar offers versatility with brewing methods, allowing you to use both reusable washable filters and paper filters. While reusable filters are convenient and environmentally friendly, many coffee enthusiasts prefer paper filters for a few key reasons:
- Convenience: Paper filters are easy to use and eliminate the need for cleaning afterward.
- Flavor Clarity: Paper filters can help to produce a cleaner, more flavorful cup by retaining some of the oils and fine particles from the coffee grounds.
- Ease of Cleanup: Simply disposing of the used filter makes the post-brew cleanup much simpler.
Using paper filters can enhance your brewing experience, especially if you’re preparing for guests or just prefer a hassle-free alternative.
Steps to Use Paper Filters in Your Ninja Coffee Bar
Here’s a step-by-step guide to using paper filters in your Ninja Coffee Bar:
1. Gather Your Materials
Before you get started, ensure you have:
- A Ninja Coffee Machine or any Coffee Maker will do.
- Number four cone filters (available in most grocery stores) *verify the size you need for your machine.
- Fresh coffee grounds
2. Remove the Reusable Filter
If you are switching from a reusable filter, be sure to remove it from the brewing basket. You won’t need it when utilizing the paper filter.
3. Prepare Your Paper Filter
To make your number four cone filter fit perfectly into the Ninja’s brewing basket, you’ll need to fold it correctly:
- Identify the Sealed Edges: Look closely at the paper filter, you will notice two sealed edges.
- Fold Along the Edges: Fold along the bottom edge and then along one of the sides. It doesn’t matter which way you fold; the goal is to create a cone shape.
- Final Shape: After folding, your filter should have a nice conical shape that allows it to be snugly fitted into the basket. This folding is key; it creates an easier fit and ensures the filter sits perfectly in the brewing basket.
4. Add Your Coffee Grounds
Fill the folded paper filter with your desired amount of coffee grounds. For a standard cup of coffee, use approximately 1-2 tablespoons of coffee per 6 ounces of water, adjusting based on your preferred strength.
5. Brew Your Coffee
Now that your filter is in place and filled with coffee, go ahead and brew your coffee as usual.
6. Easy Cleanup
Once your coffee is brewed and you’ve enjoyed your drink, cleanup is a breeze:
- Lift the entire basket out of the coffee bar.
- Take it to the trash can and dump the used paper filter along with the ground coffee.
- Dispose of the filter easily without any mess!
Conclusion
Using paper filters in your Ninja Coffee Bar not only simplifies the coffee brewing process but also enhances the flavor of your brew. With our step-by-step guide, you can ensure that your paper filter is correctly prepared, allowing for a smoother brewing experience and effortless cleanup. Embrace the convenience of paper filters and take your coffee brewing to the next level with the Ninja Coffee Bar!
Whether you’re a coffee novice or a seasoned aficionado, mastering the use of filters can elevate your daily ritual. Now that you know the ins and outs of using paper filters, it’s time to brew that perfect cup and enjoy the rewarding experience of freshly made coffee at home.
Have you tried the Ninja Coffee Bar with paper filters? Share your experience and any tips you might have! Together, let’s elevate our coffee game!

